Showing posts with label blog. Show all posts

Thursday, 29 October 2015

Blog anniversary - 5 years of Nordljus

Last week, on the 24th, my blog turned five. I missed pretty much every anniversary so far, and I've been very slow with writing up this post, but here we are.

Collage and mixed media on canvas, 2012 (37x67cm)
When I started this blog, I wanted for creativity to become a bigger part of my life again. I've painted, mostly "on the side", for many years, but university, exams, degrees, job qualifications etc. somehow always got into the way of everything else. Then I got a job at a special library that involved 4 hours of daily commuting and, being out in the sticks, often got rather lonely. I bought my first DSLR camera and got into digital photography and post processing, which led me to the world of online classes, opening up a whole new world to me. I signed up for a scrapbooking class about colour and started this blog. I had never heard of scrapbooking before, and I soon realised that it wasn't my thing at all. But I liked some of the supplies (although I didn't really like the whole industry behind it, and all the "stuff" you could buy) and their possibilities, and, having become curious about what else there was out there, I found more classes, blogs, styles, techniques, supplies, possibilities. It was exciting and I tried out a lot of different things, many of which I found weren't quite me, after all, but all of which led to a more creative life and to where I am now.


I called my blog Nordljus - A Creative Journey when I started, and a journey it has certainly been. My photography and photo editing has changed a lot since then, as has my art. All the experimenting and learning and trying out new things have helped me to develop and to begin finding my style. It is still an ongoing journey. My blog too has changed a lot over the past five years, its design becoming simpler and simpler (below are a couple of old blog headers, and there were some much wilder ones too).


A couple of older blog headers
 I recently read somewhere that blogs are become less and less popular, are on the way out and replaced by other social media such as Facebook and Instagram. While I love Instagram too, for me, blogs are still my preferred medium to see and read about other people's art and their journey. I still find them a great place to present your work and style in your way, I still enjoy reading them, and I intend to keep my blog going too. I've been wanting to completely re-desing it, and even change platform, and hopefully that's something I'll get round doing next year.

I've often felt stuck, and uninspired, and that I'm not getting anywhere, but looking back through my blog post from the past five years have shown me that that is not true. Maybe my progress is slow, but it is a progress. And it has given me new inspiration and motivation to continue. That, also, is something I like about blogs. They are such a great documentation of your journey and progress. Below are some of the things I've been up to over the past five years.

Scribbler, a simple and free online drawing programme was very popular in 2012:


I discovered art journaling and mixed media, and in 2012, I enjoyed working in Moleskine sketchbooks:


I also started to draw and sketch, something I've always wanted to do more, and discovered new techniques and materials:

<

I started to apply more mixed media and collage on canvas, finding inspiration in my environment (such as in the library):

"Overdue", mixed media on canvas, 2012 (30x30cm)

In 2013, I started to regularly draw on the train, and often in my lunch break too. I filled almost two sketchbooks with my "train and lunch sketches".


In 2013, I also bound my first sketchbook, using pages which I had printed with my Gelli plate, which I also got that same year.


At the end of 2013, I took part in a postcard swap. I enjoyed creating these cards and sending them out into the world, and receiveing cards in return. And I'm still waiting for the 10th one to arrive...


At the beginning of 2014, I started my little project of A Whole Lot Of Collages. Of course the idea was to create 365 collages, but I only ever made about 20. I really enjoyed making them, though, and I haven't given up on them quite yet (even if it's been a while since I made one...):


In 2013/2014, I tried my hand at pottery, taking a few classes. I got quite good at glazing, but never really got the hang of wheel throwing and eventually took the hint that it was paint and brush that were my medium, not a pottery wheel.


In summer 2014, I did the 70 Day Drawing challenge. 70 days, 70 drawing, no pencil. It was quite a challenge, but also great fun, and I love flipping through the pages of the little sketchbook that I filled. A good reminder to draw and sketch more and regularly again!


In autumn 2014, I did something that I've wanted to do for ages but never dared. I took a life drawing class. It was one of my greatest challenges, but also a truly great experience.


In 2015, I started getting out my DSLR camera again, and spending more time editing and continuing to improve my Lightroom and Photoshop skills.


And I discovered instant photography, aquiring a little family of vintage Polaroids cameras. It's an ongoing passion.


My blog isn't the most popular, but it is my little space, to share my work and life, to grow and to document my journey. I've met some lovely friends on the way too, and they and their art enrich my life. And now for many more creative years to come.

Monday, 19 August 2013

Some layout changes, and the problem of changing the url

Today I finally made some changes to my blog layout. I've been wanting to do this for ages, and it's just the start of the blog makeover I'm planning. Now that I have my new computer, I could finally adjust the width of the whole blog, and add a second column so that not everything needs to be crammed into one long column anymore.


I also chose another template, although I'm not 100% happy with this one. I would have liked the background to be much more white. Plain white. And I had made all the changes for that, and liked the result a lot. For one small detail. I just couldn't get rid of that fine frame around the images, even though I had set everything on transparent. Which had worked perfectly with my old template. But with the new one, it just didn't. And I really don't know why. But I really really don't like that frame. So I just had to start all over again, and try out a different template. I'm going with this one for the moment, until I can make it work the way I really want it to be.


Changing the template/layout, although time consuming, is the easy part, though. The part that is giving me much more headache is the url thing. I don't know what I was thinking when I chose the "nordljusfollowyourstar" url name. Not much, I guess. Well, I didn't know then how this whole blog thing was going to develop, so that's an excuse. But it doesn't make the whole thing any better, really.


I know that you can change the url in Blogger easily enough. Basically, you just go to Settings > Basic, and type in your new blog address. In order to make it easier for people to find you again, you can then create a new blog with your old blog address, and use that to redirect to your new address. So far so good. But. What I haven't found out yet is how it will affect the Followers option. I know that wherever my old blog address is saved/bookmarked etc. it will not be automatically adjusted, but has to be changed manually (hence the handy option of reclaiming your old blog address as redirection). But does that also apply to the Followers option? Because that would be quite a pity, really, now that I finally managed to get above the 100 followers mark. It would mean to start all over again. But I fear that that is what it means...


Then there's also the question of what address to use. Just changing that ridiculous "nordljusfollowyourstar" to a shorter version and keep the .blogspot addition, or create a custom domain name, without the .blogspot? That of course would look very neat. But would that mean that I would have to buy a domain? And where would I do that? I really have no idea. Not to mention the option of choosing a different platform altogether, such as Wordpress, which, as I understand, gives a whole lot more options of customising your blog, and even integrate both a website and a blog, should I ever wish to have a website. (Which I'm not sure of). I once had a library-related Wordpress blog, and somehow, I just didn't really like its designs so much. It seems so much more technical, and not enough creative. Typepad, I think, would be the third possible option.


So many questions to consider to get it right, as I don't want to keep changing my url again and again. 

Have you ever changed your url, or thought about doing so? I'd be very grateful for your tips, recommendations, thoughts, experiences, opinions, advice, suggestions....

Tuesday, 11 October 2011

Create your own link buttons for your blog

Are you not too happy with the link buttons provided by other social networking services? Do you feel that they just don't really fit the design of your blog? Wouldn't you prefer them to match your style and design, and to express your creativity? Well, that's how I felt about them, and so I decided to play around a little bit with watercolour paints and Photoshop Elements, and see what I could come up with. I'm quite pleased with the result, and I'd like to share the process with you. It's really quite easy, so why don't give it a try?

Start with a plain sheet of watercolour paper and draw as many squares as you need. I made them 8x8cm each, but it doesn't really matter what size you make them, just choose a size that allows you to write and paint on them comfortably.


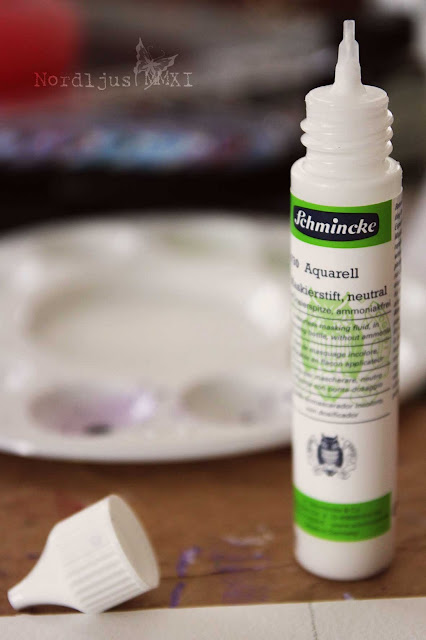
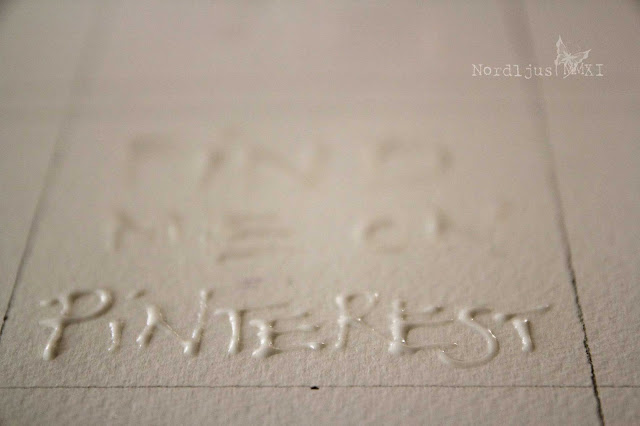
Then use some masking fluid to write the text into the squares. Masking fluids often come in bottles, and you can just dip your brush into them and apply directly on to the paper, giving you great flexibility as to thickness and brush strokes etc.You can also get them in bottles with some kind of applicator attached, which allows you to write with them directly on the paper (that's the one I used).


My bottle was a bit sticky on top and the fluid wouldn't come out at first. So I poked around with a toothpick, removed the cap, poked some more, put it on again, and gave it a good shake. With the result that I ended up with a whole puddle of it spilled all over my paper. If something like this happens to you too, don't worry. Just wipe the fluid away from the areas where you don't want to have it (it dries quite slowly so you have enough time). Take the bottom end of a brush, for example, and dip it into the puddle to write your text. You might just not get quite such an even look with this (as you can clearly see in my examples). Make sure that all the areas you want to leave white are covered with the fluid. Most masking fluids are white, but you can also get coloured ones that help you see it better when it dries transparent.


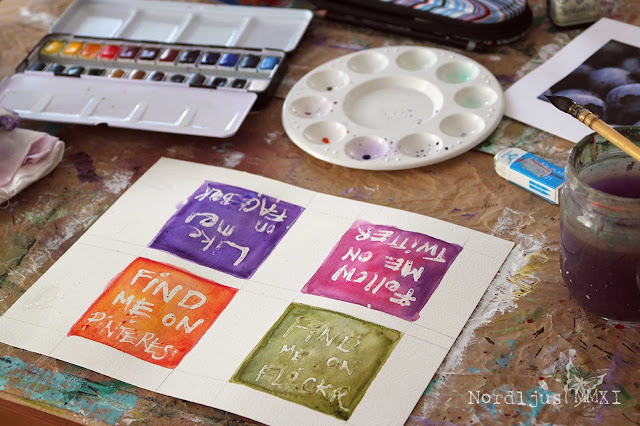
Let the fluid dry a little bit. It's okay when it's still a little bit sticky to the touch, but it should be solid enough, otherwise you'll just smear it around when painting over it, and your design is ruined. When you feel it's dry enough, take out your watercolour paints and start painting the squares with the colours you like. I actually made a little mistake - the colours for my Twitter button (I don't actually have a Twitter account I want to use right now, I just did one in case I'll decide to set one up soon) were actually intended for the Flickr button. Well, a bottle of coloured masking fluid is certainly on my shopping list :). But it doesn't really matter if some little mistakes happen, as these are your very own, individual designs, and really, you can make them however you want them.


The masking fluid rejects the water and protects the paper underneath, which allows you to cover the space freely with an even layer of colour, without having to fiddle around and trying to leave out the letters. It wouldn't really work anyway, and you can always tell. The brush strokes just aren't looking smooth and even.


Apply several layers and colours (letting them dry in between) until you're happy with the result. Then let the whole thing dry thoroughly. I know. It requires patience, but I'm afraid you'll just have to go and find something else to keep you occupied with. If it isn't completely dry, especially the masking fluid, you won't be able to peel it off. Also, a drier to quicken the process won't work here, as it will just soften the fluid again.


When it's dry, just rub the masking fluid off with your fingers. It comes off very easily, so be gentle. Your text appears underneath crisp and clean.


Now scan your sheet of paper, save as .tiff or .jpeg (or both), and upload in Photoshop/Photoshop Elements to resize and edite if required. You can either leave it in the original size and have it "shrunk to fit" automatically when you add it to your blog. This resizes it to 220 pixels in width on Blogger, for example. This is rather big though, I find, so a better option is to resize them the size you want, and upload it in that size. You might have to experiment a bit to find the size you're happy with. I had them resized 180x180 pixels, but I might want to make them even a bit smaller, as they're still quite big.

To upload the buttons on your blog, just go to Design >> Page Elements in Blogger and click on the Add a Gadget link top right. (Dashboard >> Appearance >> Widgets in WordPress). Upload your image, and add the link of your Facebook, Flickr etc. site you want it linked to in the link box. Add title and caption if you want to. (In Wordpress you also have the option to align your image and determine its size directly in the Widget upload box, apparently). Position your Gadget (or Widget) where you want it to appear on your blog - et voilà, you're very own link buttons, matching your blog design, colour scheme, and creative individuality.


I really enjoyed doing these, it was much simpler and faster than I thought. I'm sure I'll be making more of these things for my blog and keep changing them from time to time :). And I hope you find this little tutorial helpful and inspiring too. And if you like, come over and Like my Facebook Page, so that I'll eventually get a proper url for it :)

Sunday, 9 October 2011

How to be a successful blogger

Are you wondering about what makes a successful  blogger? Someone who's blog gets noticed and read, and who manages to write those kind of posts that people want to leave a comment on and to connect with others? Well, so am I. And I'm afraid I can't give you any answers to these questions, because I haven't go a clue, really.

It's almost a year now since I started this blog. I've now written almost 200 posts, an there's an average of about 30 visits each day according to the statistics. I don't really know who reads my posts. A lot of those visitors seem to come via a Google search.


It's all about connecting. I don't seem to be very good at that. Admittedly, I find it often difficult to find the time to spend a considerable amount of time with reading and commenting on other people's blog. But I do try, and I've also made an effort to try and connect with a few artist/painter bloggers from an e-course I took, whose styles appeal to me and with whom I find it would be interesting to connect. The result so far is not very encouraging. None of them seems to have any interest to connect, at least not with me.

So I've been thinking quite a bit about my blog and why I'm doing it (I must admit I'm still not quite so sure about the why). After all, it does take a lot of time to write a post and to take and process the pictures to go with it. I've been thinking about quitting once or twice, because after all, a blog is meant to be shared with whoever is out there and if no one's interested, well what's the point? I can just as well write all this stuff into my personal art journal or diary. Well, if it wasn't for my Flickr/blogger friend Nigel from Finnesse Fotografic, who keeps visiting my little corner of the blog universe and leaving kind, funny, encouraging and inspiring comments, I might well have quit. Thank you, Nigel, I really appreciate it!

So I've decided not to give up, yet. I'm willing to give it another chance, and to try to improve both my blog and my efforts to connect with others. I'll try to set some time apart during the week and/or the weekend to read and comment on blogs I like, and I've also decided to sign up for an e-course (I'm getting quite addicted to those) about blogging and how to improve one's blog and blogging skills, Blogging Your Way. Because apart from the frustrations it sometimes causes me, I'm actually quite enjoying it.

The class starts tomorrow, but we've already received some preliminary informations and instructions for accessing the forum etc., and I've spent some time today going through it all. There are two things especially I already liked a lot about this class: 1. there's a PDF-download button for every class blog post. I'm one of those people who like to print out all information and put it into folders, so that's perfect. 2. there's a class outline, complete with boxes to tick off, spaces for notes, lists to fill in with your own priorities, progress etc. and templates for notes for blogs to read and connect with. I love lists, and ticking items on them off. So, it looks like it's a class to my liking, and I'm really looking forward to when it will start tomorrow. There'll even be homework! Yay! ;). I hope to pick up some tips and tricks for improvement, and hopefully, there's soon be some noticeable changes to this blog :).