Sunday 29 December 2013

A visit to Moose & Co.

We went on a lovely walk to the local animal park yesterday, and we were really lucky to see most of the animals, playful bear cubs, sleepy wolves, lazy bisons, and - my favourites - nosy moose. Just love them, they're so sweet, with their long legs and big noses!


Unfortunately, I didn't have my proper camera with me, but only my iPhone. But I definitely want to go there more often next year. And I definitely want to sketch and paint some moose soon!

What's your favourite animal?

Tuesday 24 December 2013

*** Merry Christmas! *** (and a little tutorial)


And if you find yourself with some free hours on Christmas Eve, below's a little tutorial for this last minute, easy to make handmade Christmas decoration.

Take a piece of cardboard and prime it with gesso.


Use some letter stencils to trace the letters on the cardboard.


You could also use the stencils to fill in the paint directly. But as mine are broken, I decided to just trace the lines and paint them afterwards. This also allowed me to make them a bit bigger and bolder.


Add some more layers, details, textures, colours, emebellishments, patterns. The possibilities are endless. I kept mine quite simple.


Then cut out the letters with a pair of scissors.


Use a cutting knive to cut out the bits in between, and to do any tidying up, if necessary.


Punch two holes into the top of each letter.


Use a piece of string to string them all togher.


And it's ready to hang on a door, or wall, or your Christmas tree.

Have a wonderful Christmas!

Sunday 22 December 2013

Room for improvement

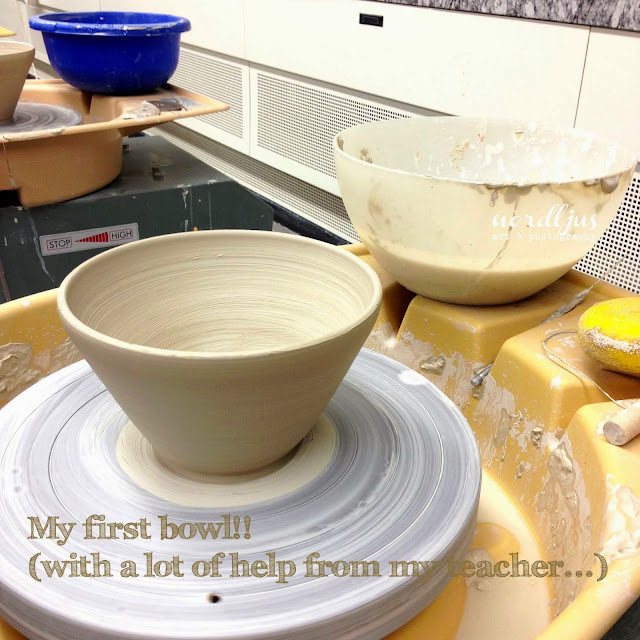
So, my first four bowls I made in the wheel throwing pottery class are finished. I always thought that the throwing part would the most difficult thing. To centre the lump of clay on your wheel, make the opening, and especially pulling up the walls. And although they are difficult, especially the last part, which I have still to master, it seems that I was quite wrong. As I discovered, when taking my finished bowls out of the cupboard after their last firing. Glazing. A science in itself, I tell you!


I have to admit I had to laugh when I saw my four bowls. Could the glazes have been any more uneven, patchy, and messy? I don't think so.


My teacher said that I could add another layer of glazing, to correct the worst bits, but I decided to leave them as they are for the moment. They are going to be my measure, to measure my improvement by comparison.


The glazes dry almost immediately when painted on, but I think I didn't wait long enough before adding the next layer, after all. With the texture of the dry glaze, it's really quite hard to see any unevenness. I thought it looked pretty good after I had put it on! Maybe next time I should try the dipping glazes, instead of the brush on ones.


Well the first bowls are finished, but last Tuesday, I've already trimmed to more bowls, and thrown another small bowl. And with the help of my teacher, I have (or she has, really) made a beautiful cylinder for to keep my brushes in. I'm really looking forward to finish that one (and hopefully make a better job at glazing). The course runs 'til the end of January, but I've already signed up for the next course. I've still got a lot to learn!

Thursday 19 December 2013

Painting your own colour wheel

In order to get to know my paints and colours again/better, I'm spending some time with mixing colours. A very useful tool for colour mixing is a colour wheel. You can buy ready made ones, very elaborate with loads of informations and in different sizes. But while they are no doubt useful, making a simple colour wheel yourself has the great advantage that it is made with your own paints and colours.

It takes a bit of time, especially if you're as useless at geometry as I am. But eventually, I figured out how to find the centre and measure (more or less) equal portions on a circle. Drawing the whole thing up on a piece of paper the size of your wheel, before copying the whole thing on your actual canvas, makes it a lot easier.


When you have copied all the sections onto your canvas, you can start filling in the colours. Start with the primary colours (blue, red and yellow), then add the secondary colours (orange, green and purple), which are opposite the primary colours. The primary colours are the colours that can't be mixed from any other colours. The secondary colours are basically the respective mixes of two primary colours.


Then add the tertiary colours in between by mixing the two colours next to it (green + yellow, yellow + orange, orange + red, red + purple, purple + blue, blue + green). Et voilà, your own basic colour wheel is finished.


I like to see how my paints look like when adding white, which makes them more pastelly. So I added another section below each of the colours/mixes.


To finish it off, I went over all the white areas with white paint, to tidy it up, and then added a layer of varnish. 

Another advantage of making your own colour wheel, apart from helping you see the relations between the different colours of your own paints, is that it also shows you the opacity/transparency of the colours. It takes some time to make, but it's worth it.

Tuesday 17 December 2013

DIY Postcard Swap, and a very special Christmas card

It's over a month now since the DIY Postcard Swap organised by iHanna, and after having posted my 10 postcards to different corners of the globe, postcards started to arrive in my mailbox in return. For a period of eight days, I received a card every day. Then nothing for a good three weeks or so, and last week, quite unexpectedly, another one arrived. So I've now got nine cards altogether. I don't know if the tenth card will arrive too, eventually, or not. I guess the latter is now more likely. But I really like the nine I got, all the different styles, techniques and mediums.


Thank you Beverly from England, Carrie from California/USA, Gail from Canada, Ellen from USA, Belinda from Alaska/USA, Lynn from Florida/USA, HS from St Louis/USA, Carolyn from Ohio/USA, and Sue from Australia.

What made more than up for the missing tenth card was the beautiful Christmas card I received from my dear friend Sandra from England. She paints the most beautiful oil paintings, among them a series of the most charming vintage teddy bears. I'm so happy to have one of her beautiful bears in my home now! Thank you so much Sandra!


Sandra's oil paintings always make me want to finally try out oils myself. I've never really quite dared so far. It all seems so complicated, dangerous, and much different form my old trusted acrylics. But I've been getting some new supplies in the past two weeks or so, and among them, some stuff for oil painting. So in the new year, oil painting is definitely something that's going to happen.

Sunday 15 December 2013

Almost finished! - Trimmed, fired, glazed, and ready for the last firing

Last week, I learnt how to trim my bowls in order to prepare them for their first firing in the kiln. To trim a bowl, you fix it on to the wheel, cut the excess clay off and establish a foot on which the bowl will stand. It's a bit of a scary process, so much that can go wrong. But it all went alright. Mostly because my teacher did most of the trimming, and I just scraped off the bits in the middle, which took me ages. And apparently, I didn't do a very good job at it. But I was just too afraid to cut too deep and make a hole.


This week's pottery class was really exciting! After last week's trimming, my first four bowls had gone into the kiln for the first firing, and were ready for glazing. 


Glazing in pottery is completely different than painting. You can't mix colours, like you would with paints, but have to use ready mixed glazes instead. There are different glazes, and different methods of applying them, such as dipping the objects into them, or painting them on with a brush. I decided to use brush on glazes, as this involved at least something that was familiar.

The glazes dry almost immediately, and they look completely different than what they do after having been fired. This glaze here, for example, is called "Iceflower", and is a lovely white with a cool blueish marbled effect, which you can't see at all here. It's just white. Another glaze I used was a deep ocean blue/gree. The liquid glaze was just a very pastel mauve, nothing at all like the intense dark deep blue/green colour on the label. I still find this rather confusing. It gives you no clue at all as to what it will look like when finished. You have to rely completely on the samples, and hope that it will turn out like that. Also, the glazes are very dry, matt and powdery. Nothing like the smooth, shiny and hard finish they'll get in the kiln.


My bowls should have gone into the kiln for the second and last firing already, or if not, should do so tomorrow. In any case, they should be all done and ready to take home by Tuesday. I can't tell you how excited I am! I just hope they all made it savely through the firing, that none of them burst, or had the glazes running, or whatever else can go wrong in a kiln at a temperature of around 1200 degrees Celsius. And maybe one of them might even make it under the Christmas tree as a present.

Tuesday 10 December 2013

Blank Canvas

I've been painting (more or less intensely) for many, many years, and for quite a few of those, I went to classes run by a local artist. I've learnt a lot from him over the years, but there is a time when one has to move on from one's teacher in order to develop further, and in my case, this moment has been long overdue. Don't get me wrong, I am very grateful for everything I learnt from my teacher. But he has his own style of painting, and his own view of how to mix colours, and of which materials and brands to use, of how things should be done, or not. And his way of doing things might not necessarily my way. At least not anymore. In the past three years or so, I've discovered a whole new world, thanks to the wonderful world of blogging and online classes. I discovered new techniques, new paints, new ways of mixing colours, new subjects, new styles, new inspiration.


So now, as we near the end of another year, I have decided that now is the time to break away from the "old" ways, and that the best way to do that is to start again, from scratch. To re-discover painting, from the very beginning. How to mix colours, how to paint different techniques, different subjects, with different mediums. I'm also in the process of re-arranging my little studio, to make more room and space for creating, so this seems to fit just perfectly too. A fresh start all around.


This whole process of re-discovering painting for myself might take a while, and I don't know how much I'll be blogging about it. I might just have to take some time off, for myself, to play, to experiment, to find my own way. I really don't know. All I know is that in order to grow and develop,  I have to start again from the beginning. Apart from re-discover my preferred medium of the past 15+ years, acrylics, I also want to finally try and discover the world of oil painting, something I've  been wanting to do for ages, but never really quite dared. It all just sounds so complicated and dangerous, what with underpaintings, long drying times, self-igniting substances and fumes...

So in the next few weeks, you might see less about painting etc., and maybe instead more photographs (another of my passions), inspirations, and a bit more about my latest passion - you might have guessed already - pottery. I really don't quite know myself how this will all go, but one thing I can say for sure; I'm really very excited about it!

Wednesday 4 December 2013

Throw it 'til you break it

I just came across this video, and I just love the bit towards the end, when he says that on the first day of wheel throwing class, he always has his students throw it 'til they break it, as this is an important step in throwing - and growing. Yep, did that, though not really on purpose. And my teacher could save it by cutting off the top, as it was the wall that broke because it got too thin. So I guess I can only grow now (and hopefully my bowls too, when I finally get the hang of pulling the wall).


He's got a great series of videos for beginners. Of course, it's much better to go to a class, do it yourself, and have a teacher helping you. But watching and observing others is helpful too. But of course every potter has their own way, and my teacher is doing some things differently than he does. But the basics are the same. And I still just find it simply magical when they pull walls!

Sunday 1 December 2013

Project 365 | November 2013

Can you believe that it's already the first day of the last month of this year today? Time's just flying this year. November brought a lot of beautiful autumn colours, some spectacular sunrises and sunsets, and the first snow of the season. I took part in a postcard swap, started taking a pottery wheel throwing class, and rediscovered DistressedFX, a photography app, that allows you to add gorgeous textures to your photos - and flocks of bird.


December started with a beautiful day, cold and frosty. Perfect for a walk in the woods. Hopefully, it will bring lots of snow and cold days.


Friday 29 November 2013

Learning something new, and loving it so far

A a few weeks ago, I decided to try out something new, something I've always wanted to do: pottery. I thought long and hard about whether to go for a sculpting or wheel throwing class, and eventually signed up for the latter. Mainly because I thought that this way, I would end up with things that would not only stand around gathering dust, but could actually be used.


So three weeks ago, I went to my first pottery class ever. I was a bit nervous, because, to be honest, while I love learning, I hate being a complete beginner. Having no clue, no control, no skill at all. But there's no other choice. I was glad that there was another beginner besides me, and the teacher took time to explain all the basics to us, and show us how to prepare the clay, and it wasn't long before we threw our lumps of clay on the wheel (so exciting!).


To prepare the clay, you have to knead it properly, to get all the air out. It's hard work, and it can take quite a while until it's ready, but it's important to do it well. When you're done, you form your clay into a ball, and then throw it on the wheel, as much into the centre as possible. Then switch on your wheel, and start to centre the clay, pulling it up and pushing it down again at first. This can take ages, and I always feel that when I finally got it centred, I've got about half of the clay I started with left. The next step is to make an opening, and then to pull the whole thing up, ring by ring, and give it the form you want. It always fascinates me watching my teacher pulling it up. It's a bit like magic. And I just absolutely can't do it. It just won't go up. I still have very little "feel" for the clay. How much pressure is too little or too much. I'm still a bit afraid of the clay. But I hope it will come soon.

Now we let the bowl dry with the help of a blow dryer for a few minutes, with the wheel spinning very slowly, and afterwards shape it with a round tool from the inside, to give it a nice round bowl shape. Then it's time to take it off the wheel and let it dry for a week or two. That's how far we got. So far, I have thrown four pieces, two bowls, and two smaller flat bowl thingies. Flat because with the first ones, the walls got so thin when I tried to pull it up that it broke and it had to be cut down, the other one because I just couldn't get it up. That last one was one that I did all by myself, without help of the teacher. Her comment on it was: "Considering that you did it all by yourself, and it's only your third day of class, you did not bad". So you can imagine what it looks like: flat, wobbly, and with a quite thick and uneven wall and rim.


Next week, we'll learn how to trim our bowls. That is, to remove excess clay with the help of a cutting tool (oh my, I can just imagine so many things that can go wrong here!!!) and to establish a foot on which the bowl will stand (which is also important for the firing in the kiln). And then it's off into the kiln for the first firing, and then it's time to glaze it (I'm really looking forward to that part!), and then back into the kiln again for a last firing at very high temperature. And then it's ready to use!

I really hope that at least some of the pieces will be finished before the Christmas break. I just can't wait to see them all finished! And I just hope that I won't mess it up too much, and not break anything.

I still got so much to learn, but I'm really enjoying it. I love the feel of the wet clay, the spinning of the wheel, the concentration and how you just can't rush it. It's very meditative, and you can really switch off very well (you'll be far too busy trying to get it centred, and up, and not send the clay flying all over the workshop to think of anything else, really). And you can throw a bowl in a relatively short time, and it's just so satisfying to see how you made a beautiful (more or less, anyway) bowl from a lump of clay. It's something I'll definitely want to continue with. My goal is to learn how to make tea mugs one day!

Wednesday 27 November 2013

No sitting in the dark, but instead a very bright Christmas ahead

Last week, I was afraid I might have to sit in the dark at Christmas, because of a broken bulb, for which a replacement seemed just impossible to find. Well, I solved the problem.


It included getting another Christmas light, though. But at least both of them are working.


But then, last Saturday, I went to the julbasar, the Christmas market organised by the Swedish church here in town, and look what I found! It was actually the very same light that I had seen in several online shops, but which was just impossible to mail order to where I live.


And then, on the way out, I saw that other, smaller, red and green one, and I just couldn't resist.


So, instead of one, I have now a grand total of four. And all of them in perfect working order. Although the two new ones are much brighter than the two supermarket ones (which are a bit pathetic, really). They don't have those strange very low volt/watt bulbs that you can't get anywhere, but proper ones, for which I can actually get replacements here.


But the main thing is, I finally got my Swedish Christmas light (and some), and I'll definitely be having a very bright Christmas.

Monday 25 November 2013

Some rearrangements, and a trip to IKEA to look forward to

There's some changes going on in the studio, which includes a weekend spent moving an entire big huge bookcase from one room to another (it's just unbelievable how many books - and other stuff - fit into one bookcase!), and a trip to IKEA next week (yay!). 


It also means that at the moment, most of my art materials are inaccessible, but once I'm finished, my little studio will have more space and storage. Can't wait 'til it's all finished!

Wednesday 20 November 2013

Sitting in the dark

I've been wanting one of those Swedish advent lights that you put in your window for ages, but there were hard to find here. Last year, finally, I spotted them in one of the supermarkets, but I was too late, they were already sold out. So this year, I made sure to go there early, and finally got one last Friday.  They're very simple, available only in red or plain wood, and with these horrible plastic thingies around each lamp. But I was going to paint it anyway, so it didn't really matter.


When I got home, before I even had unpacked it, I could hear a rattling sound inside the box. Not a good sign. One of the bulbs was broken. I considered taking it back the next day, but then I didn't really liked the bulbs either, and thought I would just go and get some new, plain ones anyway. So I spent the weekend happily painting. Several layers of white went on.


I even tried spraying the plastic thingies with a snow spray I found somewhere at the back of one of my supply boxes. But it wasn't really an improvement, so at the end I just threw them away.


I decided to keep it simple, and just added a green line around the top edges. That looks so much better, don't you think? Well, it definitely fits much better into my living room than the unpainted version.


Now all that was needed were some new bulbs. No problem, I thought, especially now, with all the Christmas lights everywhere. Well, I was wrong. It seems that getting spare bulbs is just impossible. I went to several shops, and even googled them on the internet, but with no luck. Not even in the shop where I bought the light did they have spare ones. They suggested that if I still had the receipt, I should just bring the whole thing back, and they'd change it for a new one. Yes, well, I do have the receipt, but I doubt they'll take my painted one back. Even if it does look prettier....

If you know of a place where one can buy/mailorder small 3,2V 0,064W spare bulbs, please let me know. Otherwise I might just end up having to buy another one of these lights, just for the bulbs - or sitting in the dark this Christmas...

Friday 15 November 2013

Decisions, decisions...

I've been using ready stretched canvasses ever since I've started painting on canvas (because that's how my painting teacher did it), and I've never really thought about stretching my own canvasses. But recently, I've become a bit bored with the ready stretched things. There just doesn't seem to be that much variety, at least not in texture. So I've started thinking about doing my own stretching. I ordered two sample booklets from one of the big art shops here, and oh my, so many different textures and varieties!


But now there's the problem of deciding which one. Linen or cotton? (I'm not really considering the polyester options, that just sounds wrong somehow). Primed or unprimed? Well, I know which one I like most. Unfortunately, that also happens to be the most expensive. So the problem now is to find my favourite affordable fabric.


Umprimed fabrics are less expensive, so that might be an option. But I'm just a bit concerned about how the fabric will behave, if you first stretch, and then prime it. Will it warp? Would I have to gesso it first, and then stretch it? That might be a bit akward, though, especially with the larger sizes.


Well, before I make any definite decisions, and order a bit huge roll of fabric, I'll have to do some more investigating. I bought two more sample booklets from the other big art shop here. They have some great looking, and slightly less expensive, fabrics in their catalogue, and I'm looking forward to try them out. After all, it's quite a big investment, to get a big huge 2x10m roll (they don't seem to sell them by metre here), and I want to get the right one. Although it might probably take a while to find the perfect canvas. Not easy, but rather exciting.


Linking this up to the wonderful Paint Party Friday. I know, there ins't much of painting going on here, but I hope that some of you might have some tips or recommendations for me. 

What do you use/prefer? Ready stretched, or stretching your own? Have you changed from ready stretched to making your own? Or vice versa? I'd love to hear what you think and about your own experiences.